Monday, January 2, 2023

Sprinkle the Octopus Free Crochet Pattern

Sprinkle the Octopus Free Crochet Pattern

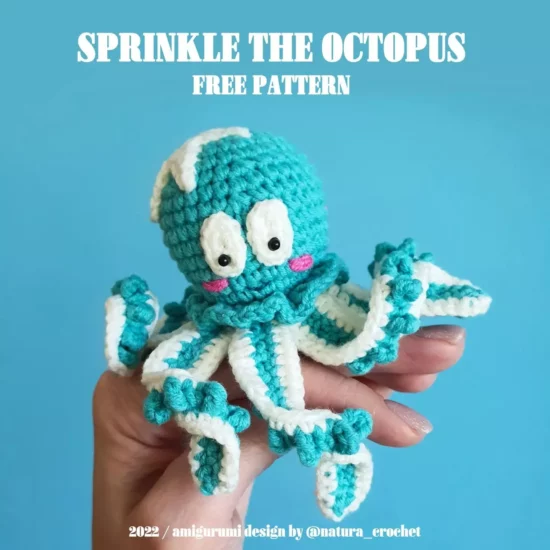
If you are looking for a cute little creature that you use as a crochet toy or a keychain, here is the right place!

In this tutorial, you can find all you need to make this free sprinkle octopus. You will need a few supplies to make this octopus like a 2mm crochet hook, mixed cotton/acrylic yarns, a sewing needle, scissors, toy stuffing, and black safety eyes.

This tutorial uses some basic crochet stitches like single crochet, double crochet, half double crochet, and double treble crochet, also you need to have some information about how to increase/ decrease, and how to work in front & back loops which make this tutorial suitable for advanced beginner crocheters.

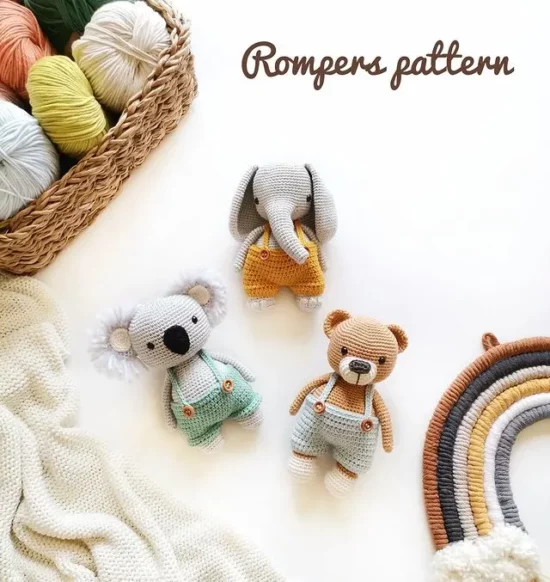
Pattern by: Natura Crochet


Materials

  • Cotton/acrylic yarns types 170-185m/50g.
  • B-1/2 mm crochet hook.
  • Sewing needles.
  • Scissors.
  • Toy stuffing (fiberfill).
  • Stitch markers.
  • Pins.
  • Scraps of yarn for embroidery.
  • Black eye beads.

Abbreviations

Mr – magic ring
Ch – chain
St – stitch
Sc – single crochet
Hdc – half double crochet
Dc – double crochet
Dtr – double treble crochet
Dec – decrease
Inc – increase
Sl st – slip stitch
FLO – front loops only
BLO – back loops only
(n) – number of stitches in round
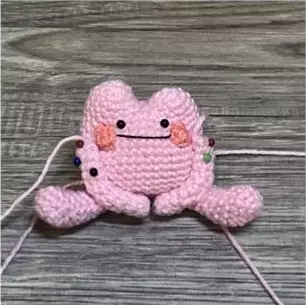
Body and Head

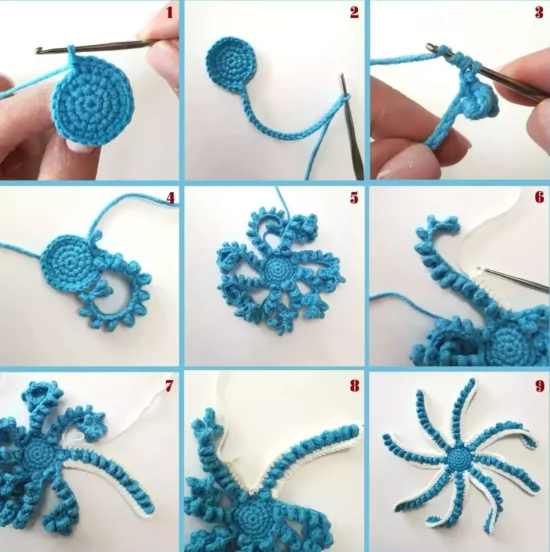
Start crocheting the tummy of the octopus. In blue.

Round 1: 6 sc in a Mr (6)
Round 2: inc in all 6 st (12)
Round 3: (sc, inc)*6 (18)
Round 4: sc, (inc, 2 sc)*5, inc, sc (24)

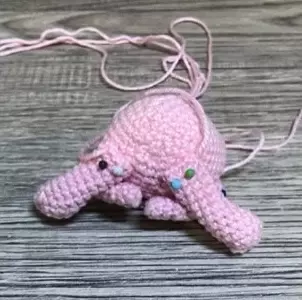
Start crocheting the tentacles of the octopus.

Round 5: (ch 25, start in second ch from hook, (sc, dtr)*12 FLO sl st in next 3 st on the octopus tummy)*8 (8 tentackes)

Change to off-white, cut the blue yarn.

Round 6: (8 hdc, 15 sc, inc, continue on the other side of the tentacle, inc, 15 sc, 8 hdc, skip 1 st on the octopus tummy, sc in next st on the octopus tummy, skip 1 st on the octopus tummy)*8 (8 tentacles)

Sl st in next st. Fasten off and weave in the yarn.

Go back to round 4 of the tummy. Pull up a loop of blue yarn in the first leftover back loop. Start crocheting the body and head.

Round 1: BLO, sl st in all 24 st (24)
Round 2: BLO, sc in all 24 st (24)
Round 3: (3 sc, inc)*6 (30)
Round 4-5: sc in all 30 st (30)
Round 6: 2 sc, (inc, 4 sc)*5, inc, 2 sc (36)
Round 7-8: sc in all 36 st (36)
Round 9: 2 sc, (dec, 4 sc)*5, dec, 2 sc (30)
Round 10: sc in all 30 st (30)

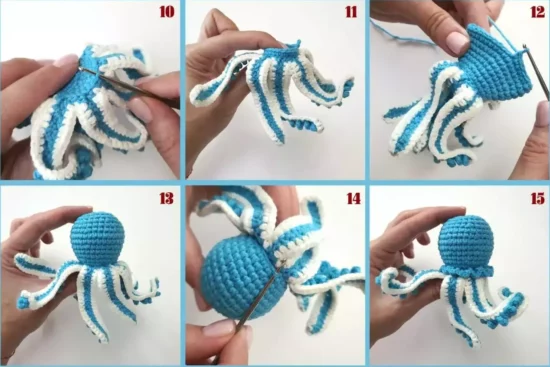
Stuff the body and head with fiberfill and continue stuffing as you go.

Round 11: (3 sc, dec)*6 (24)
Round 12: s in all 24 st (24)
Round 13: sc, (dec, 2 sc)*5, dec, sc (18)
Round 14: (sc, dec)*6 (12)
Round 15: 6 dec (6)

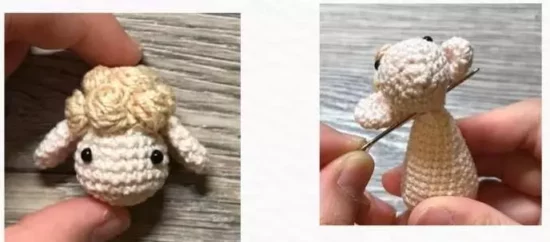
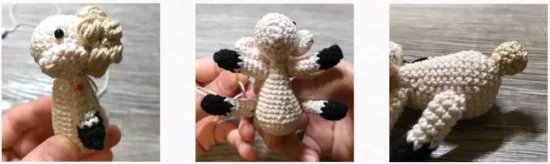
Fasten off, leaving a yarn tail. Using a yarn needle, weave the yarn tail through the front loop of each remaining stitch and pull it tight to close. Weave in the yarn end (pics 10 – 13). Go back to round 1 of the body and head. Pull up loop of blue yarn in the first leftover front loop. Start crocheting the frill.

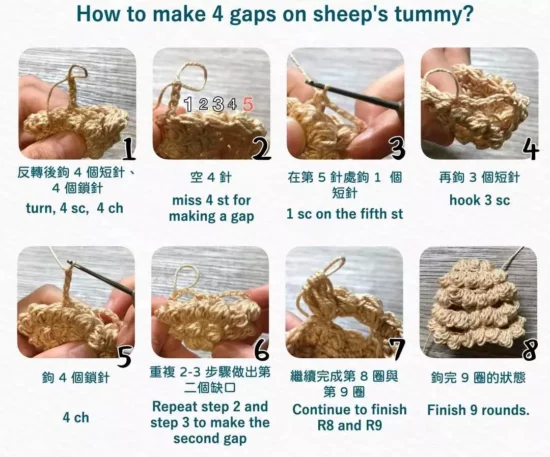
Round 1: FLO, ch 2, 3 sc in next 24 st (72)

Sl st in next st. Fasten off and weave in the yarn ends (pic 14 – 15).
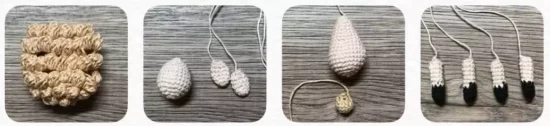
Sprinkle the Octopus Free Crochet Pattern tips 1

Eyes x2

In off-white.

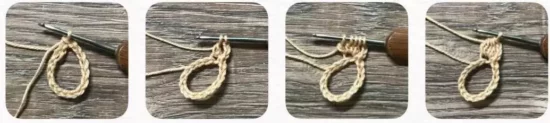
Ch 4. Stitches are worked around both sides of the foundation chain.

Round 1: start in second ch from hook, inc, 1 sc, 4 sc in last ch. Continue on the other side of the foundation chain, 1 sc, inc (10) Sl st in next st.

Fasten off and weave in the yarn. As this part is very small, highly recommended splitting a separate yarn tail into strands and using a single strand of off-white yarn to sew the eyes between rounds 4 and 9 of the body. Sew the black eye beads or embroider with black yarn.
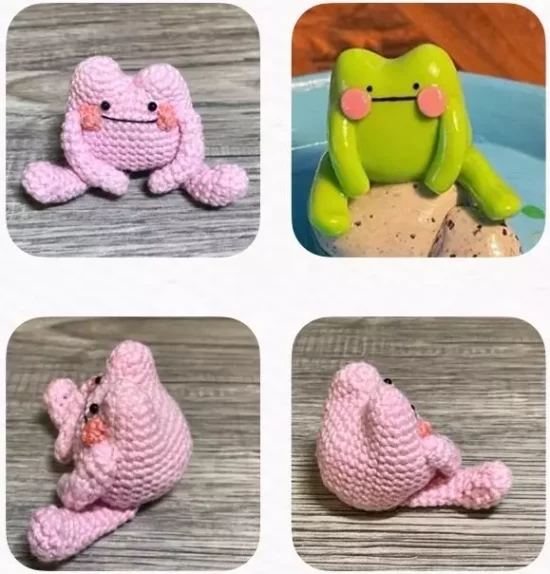
Finishing touches

  • Embroider cheeks under the eyes using fuchsia yarn. Embroider the mouth with a single strand of green yarn.
  • Sew the star on the body as you like.
Sprinkle the Octopus Free Crochet Pattern tips 2

Small star

In off-white.

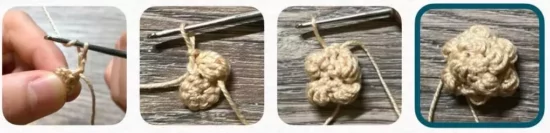
Round 1: 5 sc in a Mr (5)
Round 2: inc in all 5 st (10)
Round 3: (ch 5, start in second ch from hook, 2 sl st, 1 sc, 1 hdc, sl st in next 2 st on the small star base)*5 (5 arms)

Fasten off, cut the yarn, weave the end in between the stitches.

The post Sprinkle the Octopus Free Crochet Pattern appeared first on Crafty Club.


Friday, December 30, 2022

Cute Little Rompers Pattern

Cute Little Rompers Pattern

In this tutorial, we have a piece of doll clothing, it is a crochet doll romper pattern,  you can use it for any similar size doll or toy.

We often fill our closets with beautiful and fashionable clothes, so why not do the same for our stuffed toys and animals?

You can make this romper from stashed yarns instead of throwing away leftover yarns, and turn them into this adorable romper.

This tutorial is very easy to follow and takes no time to finish; all you need is to follow the below-detailed instructions.

Let’s get started!

Pattern by: Dudefsworld


Abbreviations

Sc – single crochet
Ch – chain
Hdc – half double crochet
Sl st – slip stitch
St-sts – Stitch-Stitches
BLO – back loop only

Rompers

First if all, crochet the first leg of the rompers and cut the yarn. In the same way crochet the second leg and continue crocheting by combining it with the first leg without cutting yarn.

Round 1: Ch 25 and sl st in the first loop. Ch 2, turn and starting from the st we sl s into: 25 hdc
Round 2: 25 hdc

Hold the legs side by side, ch 2 and join the legs by making 1 sl st into the first leg.

Round 3: Hdc in all sts around including the ch sts we made while joining the legs; 54 hdc
Round 4-10: 54 hdc
Round 11: BLO; 25 sc

Don’t cut the yarn. Ch 36, sl st into the 9th st from your hook (formed a buttonhole), sc in all sts end of the row. From the waist part of the rompers 8 sc (look at the 8th photo).

Again Ch 36, sl st into the 9th st from your hook (formed a buttonhole), sc in all sts end of the row.

The romper hangers are finished. Sew the buttons.

Cute Little Rompers Pattern tips 1
Cute Little Rompers Pattern tips 2
Cute Little Rompers Pattern tips 3

The post Cute Little Rompers Pattern appeared first on Crafty Club.


Wednesday, December 28, 2022

Bruno the Bear Free Crochet Pattern

Bruno the Bear Crochet Pattern

If you’re looking for a stuffed toy to cuddle with, let’s make this simple bear with a scarf.

This cute crochet teddy bear pattern is very easy to follow and you can find detailed instructions below.

You can change the scarf with a simple bow to give him a different look.

Legs and body are made in one piece then attach arms while making the body, then attach head and ears to the body.

This beautiful bear will be a great gift for your loved ones as a birthday gift or a baby shower gift; also you can use him as a decoration for your baby’s room or living room.

Let’s get started!

Pattern by: BumBee Crochet


Abbreviations

Mr – magic ring
Ch – chain
Sc – single crochet
Inc – increase
Dec – decrease

Head

Round 1: 6 sc in Mr (6)
Round 2: (inc)*6 (12)
Round 3: (1 sc, inc)*6 (18)
Round 4: (2 sc, inc)*6 (24)
Round 5: (3 sc, inc)*6 (30)
Round 6: (4 sc. inc)*6 (36)
Round 7: (5 sc, inc)*6 (42)
Round 8: (6 sc, inc)*6 (48)
Round 9: (7 sc, inc)*6 (54)
Round 10-19: 54 sc (54)
Round 20: (7 sc, dec)*6 (48)
Round 21: (4 sc, dec)*8 (40)
Round 22: (3 sc, dec)*8 (32)
Round 23: (2 sc. dec)*8 (24)
Round 24: (2 sc, dec)*6 (18)

Fasten off and leave a long tail for sewing.

Ears x2

Round 1: 6 sc in Mr (6)
Round 2: (inc)*6 (12)
Round 3: (1 sc, inc)*6 (18)
Round 4: (2 sc, inc)*6 (24)
Round 5: 24 sc (24)

Fasten off and leave a long tail for sewing.

Muzzle

Ch 4, from the second ch from the hook:

Round 1: inc, 1 sc, (inc)*2 in the last ch, continue working on the other side of ch – 1 sc, inc (10)
Round 2: inc, 3 sc, (inc)*2, 3 sc, inc (14)
Round 3: 1 sc, inc, 3 sc, inc, 2 sc, inc, 3 sc, inc, 1 sc (18)
Round 4: 1 sc, inc, 5 sc, inc, 2 sc, inc, 5 sc, inc, 1 sc (22)
Round 5: 22 sc (22)
Round 6: 22 sc (22)

Fasten off and leave a long tail for sewing.

Arms x2

Round 1: 6 sc in Mr (6)
Round 2: (inc)*6 (12)
Round 3-24: 12 sc (12)

Fold the edges together and single crochet them with 6 sc. Fasten off. Leave a long tail for sewing.

Legs and body

Round 1: 6 sc in Mr (6)
Round 2: (inc)*6 (12)
Round 3: (1 sc, inc)*6 (18)
Round 4: 18 sc (18)
Round 5: (dec)*2, 6 sc, (inc)*2, 6 sc (18)
Round 6: 18 sc (18)
Round 7: (dec)*2, 6 sc, (inc)*2, 6 sc (18)
Round 8: 18 sc (18)
Round 9: 18 sc (18)
Round 10: 18 sc (18)
Round 11: 18 sc (18)

Fasten off and cut the yarn on the first leg.

Make another leg in the same way. On the second leg don’t cut the yarn, continue crochet.

Ch 6 and join both legs.

Round 12: 18 sc around the first leg, 6 sc along the chain, 18 sc around the second leg, 6 sc along the chain (on its other side) (48)
Round 13: 15 sc, (1 sc, inc)*6, 21 sc (54)
Round 14-23: 54 sc (54)
Round 24: (7 sc, dec)*6 (48)
Round 25: 48 sc (48)
Round 26: 48 sc (48)
Round 27: (6 sc, dec)*6 (42)
Round 28: 42 sc (42)
Round 29: 42 sc (42)
Round 30: (5 sc, dec)*6 (36)
Round 31: 36 sc (36)
Round 32: 36 sc (36)
Round 33: (4 sc, dec)*6 (30)
Round 34: 30 sc (30)
Round 35: 30 sc (30)
Round 36: (3 sc, dec)*6 (24)
Round 37: 24 sc (24)
Round 38: 24 sc (24)
Round 39: (2 sc, dec)*6 (18)
Round 40: 18 sc (18)

Fasten off and leave a long tail for sewing.

Tail

Round 1: 6 sc in Mr (6)
Round 2: (inc)*6 (12)
Round 3: 12 sc (12)
Round 4: (1 sc, dec)*6 (6)

Fasten off and leave a long tail for sewing.

Assembly

  • Place safety eye between rows 11 and 12 with 4 sc between them.
  • Sew the muzzle to the head between approx rows 13 and 20.
  • sew the head to the body.
  • Sew arms to the body between rows 37 and 38.
  • For the scarf – cast on 6 stitches and knit stockinette stitch (1 row knit, 1 row purl) to desired length.

The post Bruno the Bear Free Crochet Pattern appeared first on Crafty Club.


Tuesday, December 27, 2022

Free Crochet Bunny Rattle Pattern

Free Crochet Bunny Rattle Pattern

If you love bunnies or know someone who loves them, so it’s time to crochet a bunny rattle. this little crochet rabbit rattle will make an adorable gift for the little loved ones in your life.

This pattern is simple and suitable for beginners; also it takes no time to finish.

You can add a simple flower or a crown to the head of the bunny to give it a different look.

To finish this pattern, all you need is to know basic stitches like single crochet and how to increase/decrease, and how to sew on parts.

Let’s get started!

Pattern by: Dudefsworld


Materials

  • Colors: cream (130), blue (297).
  • 2.2mm or hook that fits your yarn.
  • 70mm wooden ring.
  • Scissors.
  • Polyester Fiberfill
  • Stitch markers
  • Embroidery black yarn.
  • Rattle ball.
  • Tapestry needle for sewing.

Abbreviations

Mr – magic ring
Ch – chain
Sc – single crochet
Inc – increase
Dec – decrease
Hdc – half double crochet

Head

Round 1: 6 sc in Mr (6)
Round 2: 2 sc in each st around (12)
Round 3: (1 sc, inc)*6 (18)
Round 4: (2 sc, inc)*6 (24)
Round 5: (3 sc, inc)*6 (30)
Round 6: (4 sc, inc)*6 (36)
Round 7: (5 sc, inc)*6 (42)
Round 8: (6 sc, inc)*6 (48)
Round 9: (7 sc, inc)*6 (54)
Round 10-21: Sc in all sts around (54)
Round 22: (7 sc, dec)*6 (48)
Round 23: (6 sc, dec)*6 (42)
Round 24: (5 sc, dec)*6 (36)
Round 25: (4 sc, dec)*6 (30)
Round 26: (3 sc, dec)*6 (24)
Round 27: (2 sc, dec)*6 (18)
Round 28: 91 sc, dec)*6 (12)
Round 29: (6 dec)*6

Ears x2

Round 1: 6 sc in a Mr (6)
Round 2: (2 sc, inc)*2 (8)
Round 3: (3 sc, inc)*2 (10)
Round 4: (4 sc, inc)*2 (12)
Round 5: (5 sc, inc)*2 (14)
Round 6: (6 sc, inc)*2 (16)
Round 7: (7 sc, inc)*2 (18)
Round 8: (8 sc, inc)*2 (20)
Round 9-20: Sc in all sts around (20)

Rattle ring patch

Use a 70mm rattle ring.

Ch 28. starting from the 3rd st from hook; 26 hdc
Let’s c 2 at the end of each row and turn.
Row 2 – 6 (6 rows) Hdc in all sts rows.
Fasten off leaving a long tail.

Bow tie

Ch 16, starting from the 3rd st from your hook; 15 hdc
Let’s ch 2 at the end of each row and turn.
Row 2 – 6 (5 rows) Hdc in all sts row.
Fasten off leaving a long tail.

Free Crochet Bunny Rattle Pattern tips

The post Free Crochet Bunny Rattle Pattern appeared first on Crafty Club.


Monday, December 26, 2022

Amigurumi Cute Frog Free Pattern

Amigurumi Cute Frog Free Pattern

If you are new to the amigurumi style of crochet this is the perfect starting project, you can find all you need to finish this pattern in the below instructions.

With this free amigurumi pattern, you can crochet your own frog with basic crochet skills like how to make a single crochet and how to sew on parts.

You can switch between colors and make different frogs also you can add a scarf or a flower or a bow to the frog to give him a different look and then you can put them on a shelf and they can be a toy for little ones.

Let’s get started!

Pattern by: Mstinacrochet


Materials

  • Yarn colors: light pink, cinnamon.
  • Black embroidery thread.
  • Insertion eyes 2.5 mm diameter.
  • Crochet hook 1.5 mm size.
  • Cotton fill.
  • Tapestry needle.
  • Glue (optional)

The final size of the frog is 5 cm.

Abbreviation

Mr – magic ring
Ch – chain stitch
Sc – single crochet
Inc – increase
Dec – decrease
Hdc – half double crochet
Dc – double crochet

Eyes x2

use light pink color

Round 1: 6 s in the Mr (6)
Round 2: (1 sc, inc)*3 (9)
Round 3: (2 sc, inc)*3 (12)

Fasten off and make another eye.

Body

Use light pink color.

1 ch from second eye, join eyes.

Round 1: 26 sc (26)
Round 2: 8 sc, 1 inc, 6 sc, 1 inc, 9 sc, 1 inc (29)
Round 3: 9 sc, 1 inc, 7 sc, 1 inc, 10 sc, 1 inc (32)
Round 4: 10 sc, 1 inc, 8 sc, 1 inc, 11 sc, 1 inc (35)
Round 5: 11 sc, 1 inc, 9 sc, 1 inc, 12 sc, 1 inc (38)
Round 6-12: 38 sc (38)
Round 13: 11 sc, 1 dec, 9 sc, 1 dec, 12 sc, 1 dec (35)
Round 14: 10 sc, 1 drc, 8 sc, 1 dec, 11 sc, 1 dec (32)
Round 15: (6 sc, dec)*4 (28)
Round 16: (5 sc, dec)*4 (24)
Round 17: (4 sc, dec)*4 (20)
Round 18: (3 sc, dec)*4 (16)

Fill with cotton fill.

Round 19: (2 sc, dec)*4 (12)
Round 20: 6 dec (6)

Fasten off, close the hole and hide the yarn tail.

Amigurumi Cute Frog Free Pattern tips

Blush x2

Use cinnamon color.

Round 1: 4 s in the Mr (4)

Arms x2

Use light pink color.

Round 1: 6 sc in the Mr (6)
Round 2-3: 6 sc (6)
Round 4: 3 sc, 3 hdc (6)
Round 5-6: 3 sc, 3 dc (6)
Round 7-9: 6 sc (6)

Left hand: 3 sc. Fasten off and leave a long tail for sewing.

Right hand: Turn, 3 sc. Fasten off and leave a long tail for sewing.

Legs x2

Use light pink color.

Round 1: Chain 4, from the second ch from hook, 2 sc, 3 sc in the next ch, 1 sc, 1 inc (8)
Round 2: 2 sc, 2 inc, 2 sc, 2 inc (12)
Round 3: 4 sc, 2 inc, 4 sc, 2 inc (16)
Round 4: 2 sc, 3 dec, 8 sc (13)
Round 5: 2 sc, 2 dec, 7 sc (11)
Round 6: 2 sc, 2 dec, 5 sc (9)
Round 7-12: 9 sc (9)

Fasten off and leave a long tail for sewing.

Amigurumi Cute Frog Free Pattern tips 2

Assemble

  • Arms. Between R8 and R9.
Amigurumi Cute Frog Free assemble arms
  • Legs. From R17 to R18.
Amigurumi Cute Frog Free assemble legs
Amigurumi Cute Frog Free final

The post Amigurumi Cute Frog Free Pattern appeared first on Crafty Club.


Amigurumi Fluffy Sheep Free Pattern

Amigurumi Fluffy Sheep Free Pattern

One of the free amigurumi crochet patterns we will share today is this amigurumi sheep without fleece.

This free pattern is recommended for intermediate-level crocheters because of the fluffy stitch used, but still used basic stitches.

This sheep can be made as a gift for a new mom or a baby for Christmas.

You can change between colors and make different lambs to decorate your home during the spring season.

This fluffy little lamb is incredibly unique due to the yarn used to make it; it works up very quickly once you follow the detailed instructions below.

Let’s get started!

Pattern by: Mstinacrochet


Materials

  • Yarn colors: beige, black, skin.
  • Insertion eyes 3.5 mm diameter.
  • Crochet hook.
  • Cotton fill.
  • Tapestry needle.
  • Glue (optional)

Abbreviation

Mr – magic ring
Ch – chain stitch
Sc – single crochet
Inc – increase
Dec – decrease
Dc – double croche
Bst – bubble stitch
Sl st – slip stitch

Fleece

Use beige color

Round 1: 16 Ch, connect the first st and the last st (16)
Round 2: 3 ch, turn, (Bst, 1 sc)*8, sl st (16)
Round 3: (1 inc, sc)*8, sl st (24)
Round 4: 3 ch, turn, (Bst, 1 sc)*12, sl st (24)
Round 5: turn, (2 sc, inc)*8, sl st (32)
Round 6: 3 ch, turn, (Bst, sc)*16, sl st (32)

Fluffy Sheep how to make fleece

Round 7: turn, 4 sc, 4 ch for next 4 st, 16 sc, sl st (32)
Round 8: 3 ch, turn, (Bst, 1 sc)816, sl st (32)
Round 9: turn, 4 sc, 4 ch for next 4 st, 4 sc, 4 ch for next 4 st, 16 sc, sl st (32)
Round 10: 3 ch, turn, (Bst, sc)*16, sl st (32)
Round 11: turn, (2 sc, dec)*8, sl st (24)
Round 12: 3 ch, turn, (Bst, sc)*12, sl st (24)
Round 13: turn, (4 sc, dec)*, sl st and cut the yarn (20)

Fluffy Sheep how to make 4 gaps on tummy

Head

Use skin color.

Round 1: 6 sc in the Mr (6)
Round 2: 6 inc (12)
Round 3: (1 sc, inc)*6 (18)
Round 4: (2 sc, inc)*6 (24)
Round 5-6: 24 sc (24)
Round 7: (4 sc, dec)*4 (20)
Round 8: 20 sc (20)
Round 9: (3 sc, dec)*4 (16)
Round 10: 16 sc (16)
Round 11: (2 sc, dec)*4 (12)

Fill with cotton fill.

Round 12: (12)
Round 13: 6 dec (6)

Fasten off, close the hole and hide the yarn tail.

Wool on the head

Use beige color.

Round 1: 8 sc in the Mr (8)
Round 2: 3 ch, turn, (Bst, 1 sc)*4, sl st (8)
Round 3: (1 inc, sc)*4, sl st (12)
Round 4: 3 ch, turn, (Bst, 1sc)*6, sl st (12)

Leave a long tail for sewing.

Fluffy Sheep how to make wool

Body

Use skin color.

Round 1: 6 sc in the Mr (6)
Round 2: 6 inc (12)
Round 3: (1 sc, inc)*6 (18)
Round 4: (2 sc, inc)*6 (24)
Round 5: (5 sc, dec)*4 (24)
Round 6-7: 28 sc (28)
Round 8: (5 sc, dec)*4 (24)
Round 9-10: 24 sc (24)
Round 11: (4 sc, dec)*4 (20)
Round 12-13: 20 sc (20)
Round 14: (3 sc, dec)*4 (16)
Round 15-16: 16 sc (16)

Fill with cotton fill.

Round 17: (2 sc, dec)*4 (12)
Round 18: (1 sc, dec)*4 (8)

Fasten off and leave a long tail for sewing.

Ears x2

Use skin color.

Round 1: 6 sc in the Mr (6)
Round 2: (2 sc, inc)*2 (8)
Round 3: (3 sc, inc)82 (10)
Round 4: 10 sc (10)
Round 5: 93 sc, dec)*2 (8)
Round 6: (2 sc, dec)*2 (6)

Don’t stuff cotton. Fasten off and leave a long tail for sewing.

Tail

Use beige color.

Round 1: 6 sc in the Mr (6)
Round 2: 6 inc (12)
Round 3: 12 sc (12)
Round 4: (1 sc, dec)*4 (8)
Round 5: (2 sc, dec)*2 (6)

Stuff cotton. Fasten off and leave a long tail for sewing.

Legs x4

Get started with black yarn and 1.75mm hook.

Round 1: 4 sc in the Mr (40
Round 2: 4 inc (8)
Round 3-4: 8 sc (8)

Change to skin yarn.

Round 5-9: 8 sc (8)
Round 10: (2 sc, dec)*2 (6)

Don’t stuff cotton. Fasten off and leave a long tail for sewing.

Fluffy Sheep how to make legs

Assembly

  • Eyes. Between R6 and R7.
  • Ears. Between R9 and R10.
  • Wool on the head is between R9-R10.
Fluffy Sheep Assembly part 1
  • Body. Under the head and between R7 and R8.
  • Legs. Upper limbs are on R16-R17 and lower limbs are on R7-R8.
  • Tail. On R2 of the body.
Assembly part 2

The post Amigurumi Fluffy Sheep Free Pattern appeared first on Crafty Club.


Sunday, December 25, 2022

Amigurumi Office Zombie Free Pattern

Amigurumi Office Zombie Free Pattern

This office zombie is ready for Halloween; you can make an easy step-by-step amigurumi pattern for your kids. You can use it also for home decoration.

Legs, body, and head are made in one piece then hands are added to the body, then embroider eyes, mouth, and some scratches to the head and body, this makes this pattern very easy to follow and suitable for beginners.

You can make this zombie in different sizes by using different yarn weights with a suitable crochet hook.

Pick your yarn, and hook, and let’s make this free zombie pattern by following the next instructions.

Pattern by: BumBee Crochet


Materials

  • Scheepjes stone washed yarn.
  • Creative Cotton yarn from Rico Design.
  • Hook size: 3 mm.
  • Safety eye 12 mm.
  • Black and pink embroidery thread.

Office Zombie is 15 cm tall.

Abbreviation

Head

Round 1: 6 sc in Mr (6)
Round 2: (inc)*6 (12)
Round 3: (2 sc, inc)*6 (18)
Round 4: (3 sc, inc)*6 (24)
Round 5: (3 sc, inc)*6 (30)
Round 6: (4 sc, inc)*6 (36)
Round 7: (5 sc, inc)*6 (42)
Round 8: (6 sc, inc)*6 (48)
Round 9: 48 sc (48)
Round 10-17: 48 sc (48)
Round 18: (6 sc, dec)*6 (42)
Round 19: (5 sc, dec)*8 (36)
Round 20: (4 sc, dec)*6 (30)
Round 21: (3 sc, dec)*6 (24)

Fasten off. Leave a long tail for sewing.

Place safety eye between rows 13 and 14. Embroider the second eyes appr. 7 sc apart.

Embroider the cut on the head and the mouth with black thread. Embroider the cheeks with the pink yarn if you like.

Legs and body

Round 1: 6 sc in Mr (6)
Round 2: (inc)*6 (12)
Round 3: 12 sc (12)
Round 4: 12 sc (12)

Change color to black.

Round 5-8: 12 sc

Fasten off and cut the yarn in the first leg. Make another leg in the same way. On the second leg don’t cut the yarn, continue to crochet.

Ch 3 and join both legs.

Round 9: 12 sc around the first le, 3 sc along the chain, 12 sc along the second leg, 3 sc along the other side of the chain (30)
Round 10: (4 sc, inc)*6 (36)
Round 11-15: 36 sc (36)

Change color to green.

Round 16: 36 sc (36)
Round 17: (10 sc, dec)*3 (33)
Round 18: 33 sc (33)
Round 19: 33 sc (33)
Round 20: (9 sc, dec)*3 (30)
Round 21: 30 sc (30)
Round 22: (8 sc, dec)*3 (27)
Round 23: 27 sc (27)
Round 24: 27 sc (27)
Round 25: (7 sc, dec)*3 (24)
Round 26: 24 sc (24)
Round 27: 24 sc (24)

Fasten off. leave a long tail for sewing.

Tongue

Ch 3, from the second ch from the hook – 2 sl st.

Fasten off and leave a long tail for sewing.

Arm x2

Round 1: 6 sc in Mr (6)
Round 2: (1 sc, inc)*3 (9)
Round 3-9: 9 sc (9)

Fold the edges together and single crochet them with 4 sc. Fasten off. Leave a long tail for sewing.

Tie

Ch 2, from the second ch from te hook:

Round 1: inc, 1 ch, turn
Round 2: (inc)*2, 1 ch, turn
Round 3: 4 sc, 1 ch, turn
Round 4: 4 sc, 1 ch, turn
Round 5: 1 sc, dec, 1 sc, 1 ch, turn
Round 6: 3 sc, 1 ch, turn
Round 7: 3 sc, 1 ch, turn
Round 8: 1 sc, dec, 1 ch, turn
Round 9: 2 sc, 1 ch, turn
Round 10: 2 sc

Turn your work 90 degrees and make a sl st in every row and along the left side, then along the right side of the tie.

Fasten off and leave a long tail for sewing.

Assembly

  • Sew the tongue to the head.
  • Sew the head to the body.
  • Sew the arms to the body between rows 25 and 22.
  • Embroider the cut on the body with the black thread.
  • Embroider the broken part on the pants with the green yarn you used for the body.
  • Attach a couple of green yarn cut-offs to the top of the head for the hair.
  • Fasten on the back or sew th tie.

The post Amigurumi Office Zombie Free Pattern appeared first on Crafty Club.